
As a nutritionist or dietitian, sometimes you may need to edit images in your computer. Common cases include: resizing your logo, making a graph fit in a document, or modifying a picture so that it blends well in an email.
Run your nutrition practice from one place
NutriAdmin combines client management, meal planning, questionnaires, and billing built for nutrition professionals, coaches, and personal trainers — start your free trial.
Start Free TrialThis article will teach you – in 15 minutes – how to do the most common and useful graphical editing tasks on your own and for free.
Getting started
First of all, you will need to download a program called GIMP (GNU Image Manipulation Program).

GIMP is completely free, and will enable you to do most of your graphical editing. It works on Mac, Windows, and Linux. Follow these steps to get GIMP in your computer:
- Visit https://www.gimp.org
- Download the latest version
- Install it in your computer
Once you have installed GIMP, your are ready to start editing images.
Opening an image in GIMP
Follow these steps to open the image you want to edit in GIMP:
Step 1: Open GIMP. After a few seconds of loading, you will get 3 windows like the ones in the image below:

Step 2: Click on File, then Open so that you can load up your image.

Step 3: Navigate through the folders of your system, find the image you want to edit, and click on Open.

You should now be able to see your image in the central window of GIMP. It the image is too large or small, you can click on the magnifying glass on the toolbox, to zoom in or zoom out until the image fits in the window.

Now that we have loaded an image, we are ready to perform some edits.
Adding text to an image
To add text over an image (keeping the image as a background) follow these steps:
Step 1: Click on the text tool.

Step 2: Choose the font size, color, and format for your text.

Step 3: Click on your image. A little box with options will pop up.

Step 4: Start typing. Your text will show up on top of the image.
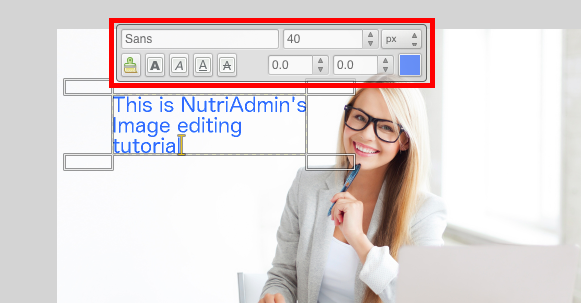
You can select the text and change its color, font size, etc by using the menu highlighted in red in the image above.
Step 5: Move the text to position it in the appropriate spot. To do so, click on the move tool on the toolbox.

Step 6: Make sure that “Move the active layer” is selected on the toolbox.

Step 7: Ensure your text layer is highlighter on the layers window. If you choose a different layer here (such as the background) then you will be moving that other layer.

GIMP let’s you control different elements of your image as separate layers, so that you can reposition, resize, and manipulate separately.
Step 8: You can now drag-and-drop your text anywhere you want in the image.

Rotating and flipping an image
Sometimes, you may want to change the orientation of an image. Follow these steps to apply this transformation in GIMP.
Step 1: Click on Image on the top bar.

Step 2: Hover with your mouse over Transform.

Step 3: Choose an option. You can flip, or rotate an image. Below is an example of horizontally flipping the image.

Note: You can undo any changes you have made by pressing Cmd+Z in Mac (ctrl+Z in windows). Additionally, there is an undo history on the right panel where you can return to any previous state of your image if you have made a mistake or if you don’t like a certain transformation you have performed.

Changing image colours
Applying image colour filters, such as making your picture black and white or changing the brightness is simple.
Step 1: Click on Colors on the top bar.

Step 2: Choose the appropriate option for the operation you want to perform:
- Brightness-Contrast: adjust the level of light in the image
- Color Balance: make your image more/less red, blue, or green
- etc
There are many options to adjust the colours in your image. You can experiment, undo changes if you don’t like a particular result, and settle when your image looks best.
For extra options, you can also click on Filters on the top bar. The kind of modifications you can make are similar to Instagram filters if you are familiar with them.
Image cropping
To crop a portion of your image, follow these steps.
Step 1: Pick the Rectangle select tool from the toolbox.

Step 2: Make sure that the mode Replace current selection is selected.

Step 3: Drag and drop over the area of interest in your image to draw a rectangle with your selection.

Extra tip: you can hold the Shift key in your keyboard whilst selecting to force the selection to be a square.
Step 4: Click on the corners of the box to re-size your selection until it contains the area you want.

Step 5: Click on Image on the top menu
Step 6: From the options available in the image menu, click on “crop to selection“. The result will be your cropped image.

Extra tip: If you are editing an image that has surrounding white space, and all you want to do is to remove this extra padding, you can click on Autocrop image and GIMP will eliminate the unwanted empty space.
Image scaling
Sometimes you may want to scale down your image, so that its size is smaller. This is specially relevant if you want to add your image to a website or email, where there may be size restrictions.
To resize an image, follow these steps:
Step 1: Click on Image on the top bar.
Step 2: Click on Scale Image….
Step 3: Choose the new dimensions of your image.

Tip: If the chain icon next to Width and Height is clicked, then the aspect ratio of your image will be preserved when you scale it down.
Pro tip: If you want to compress your image further, so that it takes less space in disk – but keeping the quality intact – you can use a free online service like
compressor.io
Saving and exporting an image
By default, GIMP will save images in a .xcf format. This format is useful if you want to come back to your image to continue editing it in the future. However, you cannot use images in this formats outside of GIMP.
In order to export your image to a useful format (like .jpeg, .png, etc) follow these steps:
Step 1: Click on File in the top menu.

Step 2: Click on *Export As…”.
Step 3: Choose the appropriate folder in your file system.
Step 4: Rename your file including the file extension. E.g. myimage.jpg.
The most common image formats are: .jpg and .png. PNG keeps a higher quality and makes text more legible but the resulting image is larger in size. JPG compresses the image and is a useful format for the web or email attachments.
Conclusion
This article has covered perhaps 1% of what GIMP can do. There are hundreds of different tools for manipulating your images.
Hopefully, this introduction serves to get you started and guide you through some of the most common image operations you can do on your own.
GIMP is a very popular program, so if you want to do something not listed in this article, you can always google how to do blah blah blah in GIMP. There are many video tutorials in youtube as well.
If you liked this article, you can bookmark it in your browser, and come back to it next time you need to edit an image. Once you do it a few times, it will become second nature.
Thanks for reading, and please consider subscribing in the yellow box below if you want to get more tips for nutritionists and dietitians in your inbox.